NODAR HDK Manual v2.0
1. Introduction
The NODAR Hammerhead Development Kit (HDK) generates high-quality point clouds from a pair of cameras. It automatically calibrates and generates depth maps for a stereo vision camera setup. The HDK allows you to utilize high-resolution cameras, simplifies calibration, and enables wide-baseline, long-range stereo vision. This document assumes that the two provided lens-camera pairs are parallel and facing forward (along the direction of vehicle motion).
1.1 Purpose and Scope
This document is intended to guide the initial setup and first run of your HDK. It includes information on the components of the system and instructions on how to perform system assembly, configure system parameters, launch the HDK application, and record data for diagnostic evaluation.
The Hammerhead Development Kit is referred to as HDK in this document to improve readability.
1.2 Audience
This document is intended for trained engineers tasked with integrating, testing, or evaluating the system. Users are assumed to possess an operational understanding of camera-based vision systems, familiarity with network configuration, and terminal usage in Unix environments.
It is highly recommended that the user read and understand this document in its entirety prior to installation and operation of the system.
1.3 Variants
The HDK is available in two compute variants:
- HDK: built around the Aetina OnLogic Industrial Orin AGX, a ruggedized industrial compute platform.
- HDK Nano: built around the NVIDIA Jetson Orin Nano, a smaller and lower-cost compute platform.
Both variants use the same Hammerhead sensor and run the same Hammerhead and Nodar Viewer software. They differ in the compute unit, in how the cameras and the host computer are connected to it, and in throughput. Instructions in this document apply to both variants unless a section is explicitly labeled HDK or HDK Nano.
Expect roughly half the frame rate on the HDK Nano. The Orin AGX has twice the CUDA cores and eight times the memory of the Orin Nano.
Choose the HDK when frame rate, resolution, or ruggedization matter, and the HDK Nano when size, power, and cost matter more than throughput. Current measurements for every supported device are published on the Benchmarks page; check them against your application's requirements before committing to a variant.
2. Unboxing
2.1 What's in the Box?
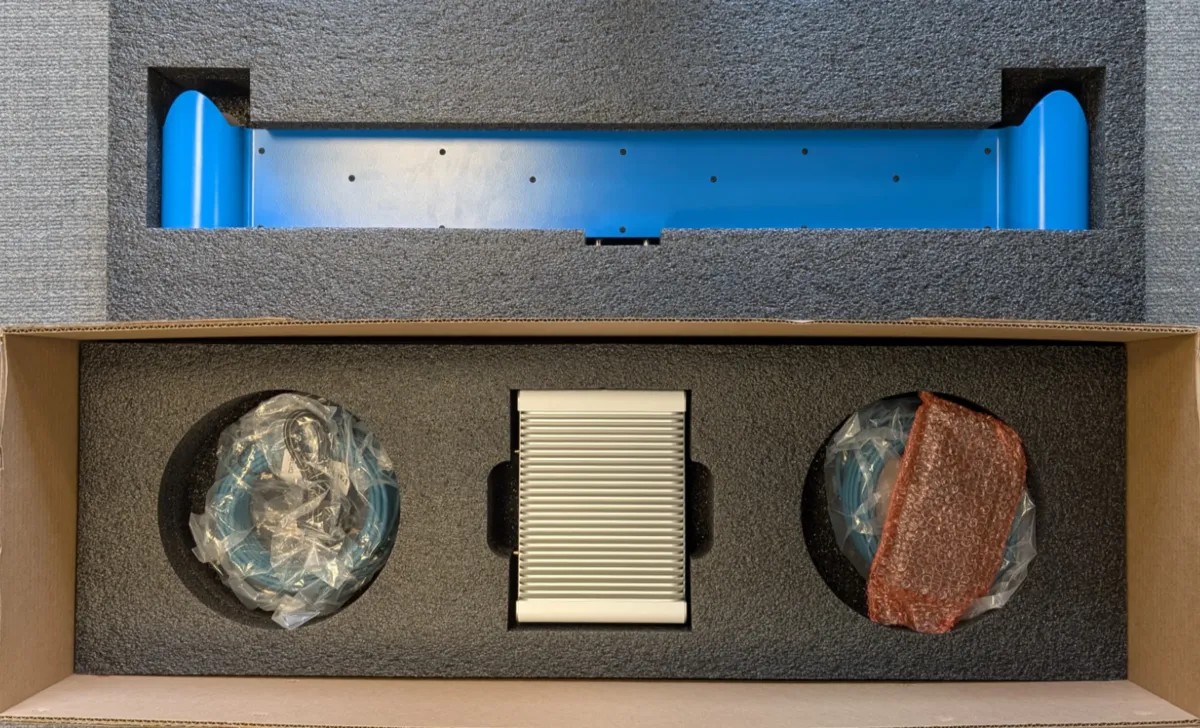
The NODAR HDK comes assembled and is ready for testing within minutes. The figure below shows the components of a typical HDK kit. Your kit may vary slightly from this configuration.
An HDK Nano kit is shown below, with the sensor bar, compute unit, PoE switch, power supplies, adapters, and cables. The unit pictured is a customized four-camera build; a standard kit ships with two cameras on the bar.
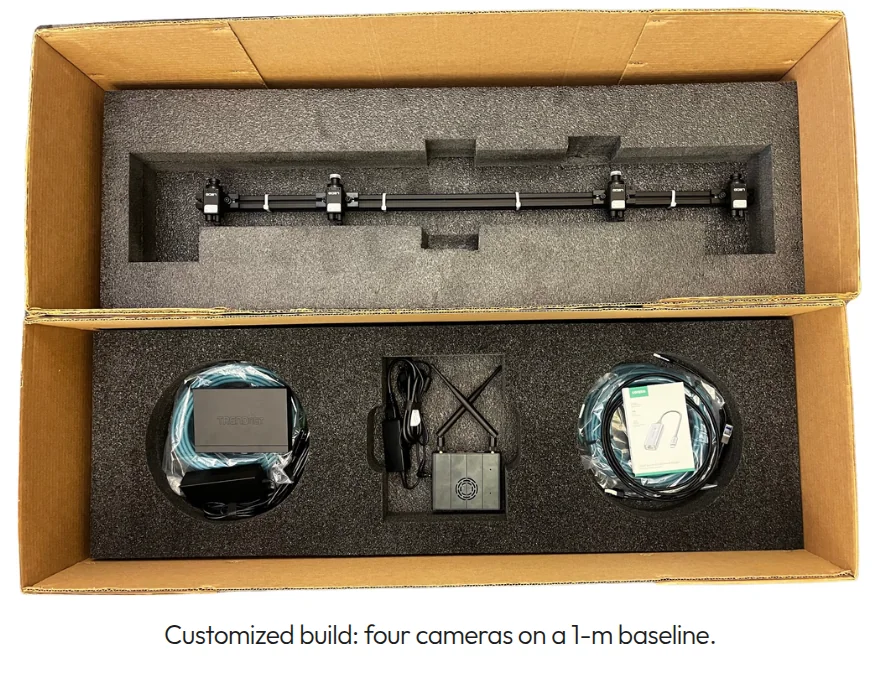
Carefully unpack the case and ensure that all the components mentioned in the packing list are present in the kit. A typical kit will contain the items listed in Table 1.
| Item | Quantity |
|---|---|
| Hammerhead Sensor | 1 |
| M12-to-RJ45 IP67 Cat6a Cable, 15.0m | 2 |
| Compute unit (see Table 2) | 1 |
| Compute power cable | 1 |
| Ethernet cable | 1 |
Table 1: System Components
The compute unit and the adapters used to connect the cameras and the host computer depend on your variant:
| HDK | HDK Nano | |
|---|---|---|
| Compute unit | Aetina Onlogic Industrial Orin AGX | NVIDIA Jetson Orin Nano |
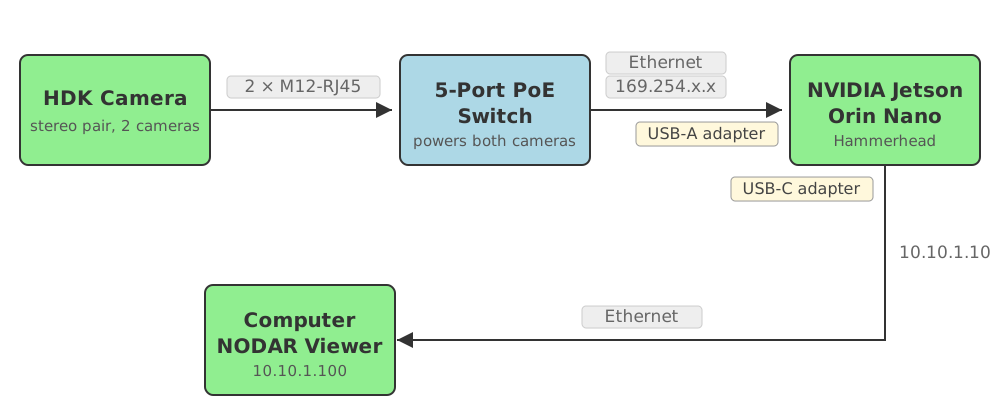
| Camera connection | Onboard PoE ports 1 and 2 | 5-port PoE switch into a USB-A adapter |
| Camera power | Onboard PoE ports | 5-port PoE switch |
| Host connection | Onboard 10G port | USB-C-to-RJ45 adapter |
| Frame rate | Baseline | Roughly half the HDK (see Benchmarks) |
Table 2: Compute Variants
The HDK Nano connections are shown below.
2.2 Handling and Operation
The HDK hardware contains sensitive electronics, optical elements, and glass components that need to be handled carefully. Please connect all cables before applying power to the system. Disconnecting any cables while the system is powered on may damage the system. Before operation, visually inspect the system for loose cables, debris on the optical elements, or any other damage to the kit’s components. Tie down any loose cables in a tension-released manner to prevent tripping hazards and avoid exerting excess force on any connectors while the vehicle is in motion.
The sensor assembly is designed to be operated outdoors on natural scenes while mounted on a vehicle. However, initial setup and verification may be performed indoors if necessary. Note that the system works best on natural scenes, and the quality of the results may be sub-optimal in indoor office environments with poor lighting or shiny/texture-less surfaces. For best results while setting up indoors, point the cameras through a window at any natural scene.
3. Assembly
This section outlines the procedure for setting up the HDK hardware. The entire assembly should be initially tested as shipped to verify that everything is in working order. As outlined below, the sensor assembly may also be mounted using additional hardware.
3.1 Connecting Cables
For cable connection instructions, please refer to the Getting Started Guide.
3.2 Cleaning and Modifications
The sensor assembly, comprised of the framing rail, sensors, and mounts, consists of IP67-rated components and can be mounted on the exterior of a vehicle. During regular operation dust, debris, or moisture may accumulate on the IP67 lens tubes resulting in a degradation of output data. It is recommended that the lens tubes be wiped with a microfiber cleaning cloth before operating the system whenever this happens.
3.3 Mounting
The Hammerhead sensor has multiple 1/4-20 mounting points on the back and bottom. These can be used with most standard camera mounts. When mounting on a vehicle or any situation where the Hammerhead sensor may move, we recommend attaching eye-bolts and running a strap or other connector through the eye-bolts as an additional safety measure.
4. Application Configuration, Launch, & Interaction
The compute for this system is the Aetina Onlogic Industrial Orin AGX on the HDK, and the NVIDIA Jetson Orin Nano on the HDK Nano. In both cases the HDK software comes pre-installed on the Orin included with the kit. For initial setup, it is necessary to connect a mouse, keyboard, and display to the Orin.
You can launch Hammerhead from the terminal with hammerhead
You can launch Nodar Viewer from the terminal with nodar_viewer
4.1 Nodar Viewer
The Nodar Viewer is optimized for visualizing the output from Hammerhead, providing a way to analyze and interact with Hammerhead. Designed with a focus on low latency and high-speed operation, the Nodar Viewer ensures smooth performance. The Viewer also offers the ability to play back recorded data.
The Viewer can be run directly on the Orin for quick viewing and system verification. However, for data collection and long-term operation, it is recommended to install the Viewer on a separate computer and connect to the HDK over the network (see Connecting to a Computer). This approach offloads visualization and recording tasks from the Orin, ensuring optimal performance.
On the HDK Nano, expect the Viewer to update at roughly half the rate you would see on the HDK at the same resolution and settings. This is a property of the compute unit, not a fault. See the Benchmarks page for the measured frame rate of your device.
4.2 Communication interface
The Hammerhead Development Kit (HDK) offers several communication options enabling integration into diverse applications.
4.3 Calibration
The HDK is factory-calibrated before delivery.
For a detailed description of the initial calibration routine, please consult Initial Calibration.
5. Connecting to a Computer
For data collection and long-term operation, it is recommended to connect the HDK to a separate computer and run the Viewer there. This offloads visualization and recording tasks from the Orin, ensuring optimal performance.
On both variants the Orin presents itself to your computer at the static IP 10.10.1.10,
and your computer is configured with a static IP in the same subnet. The physical interface
used on the Orin differs by variant.
5.1 HDK (10G port)
To connect the HDK to a computer, use the 10G port of the ruggedized Orin.
The 10G port of the ruggedized Orin has a static IP of 10.10.1.10 (if you have a HDK version greater than 2.4.2)
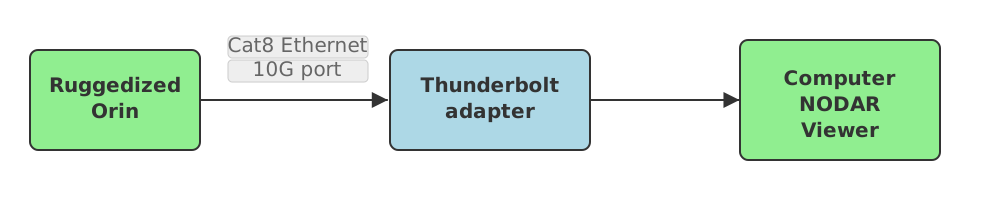
In case you have a 10G port on your computer, you can directly connect it to the ruggedized Orin. In case you do not have a 10G port but have a Thunderbolt port, you can use a Thunderbolt adapter such as OWC
Make sure you use high quality Cat8 Ethernet cables which are meant for high bandwidth data transmission.
5.2 HDK Nano (USB-C-to-RJ45 adapter)
The Orin Nano has no 10G port. Connect your computer to the USB-C-to-RJ45 adapter. Be sure to use the host (data-out) adapter and not the camera adapter. See Setup for how the two are assigned.
The setup scripts give this adapter the static address 10.10.1.10/24.
This link carries less bandwidth than the HDK's 10G port, so at high resolutions and frame rates you may need to reduce the amount of data streamed to the Viewer to avoid dropped frames.
5.3 Configuring your computer
You should configure your computer's Ethernet interface with a static IP address in the 10.10.1.X range (e.g., 10.10.1.100), ensuring it is on the same subnet as the Orin (10.10.1.10).
The easiest way to interact with the HDK is through the Viewer. You can download the Viewer on your computer by following instructions here.
6. Data Collection on the Computer
When collecting data with the HDK, it is recommended to start and stop the recording directly from the Viewer on your computer. This ensures proper synchronization and minimizes the risk of dropped frames.
To achieve the most reliable data capture:
- Close all open Viewer tabs except the Data Collection tab before starting the recording. Visualizing data (e.g., live point clouds) during capture can consume significant system resources and result in frame drops.
- Record only the data you actually need for your session. This helps conserve storage space, and optimizes bandwidth.
- Make sure your network connection to the Orin is stable before starting collection.
- Use a high-performance SSD for recording to avoid write-speed bottlenecks that can cause frame drops.
- Verify that your storage device on the computer has enough free space for the planned capture session.
By keeping the Viewer focused solely on the Data Collection tab and avoiding unnecessary live visualization, you maximize the integrity and performance of your recordings.
7. Legal Notice
The Hammerhead Development Kit (HDK) is protected by a range of patents. For details on patent protection and software licenses, please refer to Legal Notice.
8. Frequently Asked Questions (FAQ)
The Frequently Asked Questions and Troubleshooting Guide is a growing collection of answers to the most common questions users encounter when working with the HDK. This resource is regularly updated and can be found on the FAQ page.
9. Contact Us
If you need support from our support engineers, please send us an email at support@nodarsensor.com.